Showing posts with label Pinterest. Show all posts

Friday, September 13, 2013

The Recipe Crucible: Pillsbury Biscuit Turkey & Muenster Grilled Sammies


A little Bianca factoid...yes, I keep a very healthy Pinterest account. But when a recipe has been tried and true, it makes its way into my legit recipe box. It's written on paper and hopefully immortalized for the next 50 years (or more, if one of my children end up loving cooking too!).

September has always been a time of transition for myself and many other families. It's the start of school, obviously a change in season and it always seems like I am moving in September / October. I'm going to say this one last time - this better be the last time we move for like 15 years!! ;)

During this time of transition families are busier than usual and honestly the time and energy spent in cooking sometimes takes a nosedive. Our family doesn't have anyone starting school (not for a couple more years), but the transition of moving into our new home and the renovation taking place in the kitchen has definitely made things a little tighter, less comfortable and not as easy to prepare full on dishes like I normally like to.

So this little quick and easy recipe that I'm going to share with you below is in the beginning stages of this crucible - initially saved via the internet/this blog, and maybe one day will graduate into recipe cardhood.

Originally adapted from Grands! Grilled Cheese Sandwiches.


You will need:1 can (16.3 oz) Pillsbury® Grands!® refrigerated buttermilk biscuits (8 biscuits)
8 thick slices of Muenster cheese (I went straight to the Deli counter and asked for nice thick slices)
1/2 lb of pepper crusted sliced turkey breast meat (also found at your Deli counter)
honey mustard
extras: avocado, tomato, bacon
Makes 4 sandwiches


You will do:
1. Heat a non-stick skillet on high heat. 

2. Meanwhile, flatten the biscuits into discs, similar to mini personal pizzas. The key here is to get them nice and thin, otherwise you'll end up with regular biscuits! You can stretch them like pizza dough or use a rolling pin.

3. Once the pan is hot and the biscuits are flat, add one or two biscuits at a time to the hot pan. Cook for 1-2 minutes per side. Once it is brown (like a pancake) flip it over and cook the other side. Set aside when cooked.
4. After the biscuits are cooked, layer on a spread on a little bit of honey mustard, add two slices of cheese, some meat and any of your additional toppings. Sandwich together.
5. Return the sammies to the hot pan, adjusting the temperature to medium/low so that the cheese can melt without burning the biscuit. 
6. Bon appetit! These are so simple that you can really adjust them to fit whatever you have in your fridge for a hot sandwich.


What would you fill your sammy with?
Download the Pillsbury recipe booklet for more easy recipes and comment with a Pillsbury Grands! Biscuits recipe you'd love to try!


I was selected for this opportunity as a member of Clever Girls Collective. The content and opinions expressed here are all my own and are not indicative of the opinions or positions of General Mills. Compensation was provided by General Mills via Clever Girls Collective.

Saturday, August 31, 2013

Just Peachy: Dessert Recipe Round Up


This week I bought a case of peaches...and kind of ended up with more than I can handle! But that's a good problem to have right?

So I spend an afternoon canning half of the case by using this tutorial from Make it Do. Super easy to follow for the novice canner without any extra special ingredients or tools. Just jars, water, sugar, peaches, big ole pot of water. Lots of time. Do it - you will be happy you did!

But I'm still left with a ton of peaches, and there's only so many times per week that I can make my super secret peach cobbler and still feel good about my self image. So I talked to some of my bloggy friends and they all shared their peachy recipes for me pass on to you! How nice!

So go ahead and pin this list round up and keep it around for the next couple weeks while peaches are in season and cheap. You'll be glad you did! And when you do try any of them out, be sure to let me know what you though! (And of course, give the author some love too!)


This isn't from a blog, but I tried these skillet pork chops with peaches from McCormick. I try to avoid copious amounts of salt, so I cut it down to 1/2 tsp of Lawry's.

A few ideas from The Pierogie Mama's kitchen:
Freeze slices on a cookie sheet to have for smoothies for the rest of the year
Puree / Mash up left over pieces and put them in a reusable baby/toddler food pouch.
---Like a Yummi Pouch - enter to win a pack here!---
Mix with finely milled oatmeal, yogurt, applesauce, roasted sweet potatoes or bananas! 
Got a recipe to share? Link up in the comments!

Sunday, June 30, 2013

Home Update #2

I've occasionally written about our current living situation. Here's a quick recap:

In Sept 2012, my husband and I sold our home that we dubbed "The T-ton Tear Down" / "TTD." We bought this house in 2010 and in one weekend had a group of our friends and family help us tear out all the flooring and kitchen out so that we started with a blank canvas for our renovation. Perhaps not the best plan of attack, but hey - it was a learning process!

That month we put an offer on New Home #1, which was a foreclosure and vacant so we rented it from the bank during the purchasing process. We ended up moving out after 3 months and abandoning our offer due to a few things coming to light about the house that weren't caught during the inspection. Like a failing septic system.

We moved out and moved into a temporary rental through our friend and are now in the process of our offer on a house that we have very high hopes for. Just like our last house, it has good bones but is in need of some major repairs. We like to capitalize on these kinds of houses because the typical homebuyer shies away from them. New paint, flooring, kitchens, etc don't scare us. My husband and I have learned that there are many aspects of renovations that are completely doable, given the right skill set. Like understanding basic construction, being comfortable with power tools, being friendly with your local hardware store, and able to watch YouTube videos. Not kidding on that one. Oh, and maintain a Pinterest account ;) Of course, even we have our limitations - we had our TTD kitchen's electrical work professionally installed and the granite counter tops were installed by a fabricator as well. But that's pretty much the extent of it.

Last Thursday we had the inspection on the prospective home. Luckily, there wasn't anything we learned that we hadn't known. It's going to need a new roof, likely new siding (which we will wait to do next summer). It needs new flooring and paint inside - immediately. The current family (parents, 4 teens, 2 dogs and I can detect the presence of rodents or ferrets in the past) has lived in this house hard. Although it's been made tidy for our walk throughs and the inspection, it very clearly hasn't had a deep cleaning in years. Mold and mildew on all the windows, clogged drains, nasty growths in caulking around the toilets and sinks. Nothing we can't handle.

It's been fun walking through this house and dreaming up what we'd do to it to not only fix current issues but to make it better. We've been given a tentative closing date of August 4th, which if course can change quickly, but we're hopeful. We'd love to move in before the end of the summer to take advantage of the good weather and tidy up the outside of the house before the rain sets in.

All of the potential in this house has got us so excited. The ability to test our chops on another renovation, a great sized shop in the backyard (that doesn't overshadow the space at all), being in a family friendly neighborhood with 2 parks within a couple blocks and a large park with a lake, shelters and skate park within a mile walking distance away, and a shorter commute to work for Adam.

So send up a little prayer for us, cross your fingers and toes, and keep an eye for more updates. Also, you can follow my I Have a PhD in Renovating Pinterest board to see some of the inspiration we've got in store for this new house!

Saturday, March 16, 2013

The Maternity Sash: The process of one year

Ahh the wonders of Pinterest. I love looking there for inspiration, don't you? I was newly introduced to Pinterest when planning for my maternity shoot (thanks to the wonderful Theresa at TC Photography) and was able to find quite a few ideas that I loved and that my photographer helped me recreate.

One of the sweetest ideas I came across was the maternity sash. You can find beautiful versions on Etsy, but I opted for the DIY route. One of my manifestations of nesting was becoming a little crafty.  We were in the process of moving so I didn't have a way to put that energy towards a baby room, which wouldn't have been necessary anyways because even at a year we still bed-share.

So I visited my local craft store, used a few tutorials on fabric flowers and put together my own maternity sash!


The end result - a sash that I used for belly, newborn and one year old pictures. Who knows? Maybe it'll stick around for many of Penny's other milestones. Adam would like to put the kibosh on that because he thinks the feathers are gaudy, but I thought they were quite cute!
P.S. - I miss those little squishy cheeks so much!

Did you use a prop throughout your baby's growth to keep a theme going?


Thursday, February 21, 2013

Baked Spaghetti Pizza

OH NO SHE DIDN'T!

Yea, I went there. 

I've combined two of America's favorite dinners into one. Spaghetti and Pizza.

I came across this idea through Pinterest..Of course, there just aren't any unique ideas out there anymore, are there?

Einstein, Pinterest was obviously a glimmer in your eye long before 2009.

Back to food.

To my credit, I don't think I've ever found a recipe for calzone style baked spaghetti. This recipe features home made pizza dough vs using store bought frozen bread dough. It made a big difference.

It's a great way to A) feed a bunch of people B) feed two people to the point of a food induced coma or C) use left over spaghetti.. which lets face it, doesn't happen too often. At least not in my house. I think my husband was Italian in a previous life. He will eat pasta 8 nights a week if I let him ;)


You will need:
Basic Pizza Dough
Corn meal
1/2 package of spaghetti noodles, cooked all dente and drained
Pasta sauce (I recently discovered Safeway's O organic roasted garlic sauce.. So surprisingly good!)
Shredded Parmesan cheese
2 T of melted butter
1/4 t of garlic salt
Preheat oven to 375°F

*Note: This recipe makes a loaf that can be shared between two people. You'll have left over pizza dough, which you can use to make more baked spaghetti pizza or refrigerate and make your own pizzas later!

You will do:
1. Prepare the pizza dough ahead of time. It will need to rise for about 90 minutes, or until the dough has doubled in size.
2. Combine your cooked spaghetti noodles with pasta sauce, using however much sauce you normally use.
3. Divide the pizza dough into two pieces. On a floured surface, roll out one half into a rectangle, short side facing you. It should be roughly 18 - 24 inches long.

4. Sprinkle corn meal onto a baking pan lined with parchment paper.
5. Transfer the rectangle onto the parchment paper or stone.
6. Carefully dump the spaghetti onto the dough so that it is roughly in the center 1/3 of the dough.

7. Top with the shredded cheese, to your liking. The cheesier the better!
8. Using a knife or kitchen scissors, cut horizontal strips up both of the long sides of the dough. They should be about 1 inch wide.
9. Fold each strip at a diagonal and alternate sides, so that it looks almost like a shoe-lace pattern. Tuck the ends of the loaf in.
10. Stir together the melted butter and garlic salt. Brush onto the top of the loaf.
11. Transfer into the preheated oven. If you are using a pizza stone, I slide the loaf with the parchment paper onto the stone so that the tomato sauce doesn't get all over it.
12. Bake for ~20 minutes, or until the dough has a good crust to it. I baked my first one for about 25 minutes and it was a little too much.
13. Remove from the oven and let cool! Cut into slices and serve.

Dress it up by adding your favorite spaghetti toppings (olives, mushrooms) or something you'd normally put on pizza. I wonder how pineapple would taste?


Monday, September 17, 2012

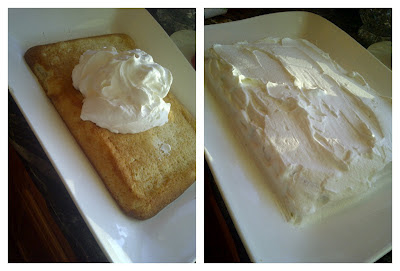
Pinterest Summer Recipe Challenge: Tres Leches Cake

If you are a Pinterest addict like I am, you'll know that sometimes you pin ideas that you, for all intents and purposes, plan to try at some point. My recipe board, Nyam, is full of those. I decided that this summer, I'm actually going to make use of this board and try these recipes out. My goal is 1-2 recipes per week, and I'm calling it my Pinterest Summer Recipe Challenge. You can find more of my challengers here.
 

So here we go - my finale: Tres Leches Cake.

I've heard about this cake in the past, but for some reason assumed that it would be too difficult to make. On the contrary, it's really simple. This recipe is brought to you by the fabulous Pioneer Woman, whose blog has made her way into my daily blog digest. This is my first recipe that I'm trying out from her, but I've got my eye on a few more that I'll be checking out in the future.

I made this cake for my littlest brother's 21st birthday. I had been trying to find an excuse to make this cake (making it just for a family dinner didn't seem to be justifiable) and I don't even know if my brother knew what tres leches cake was, but too bad - I was commissioned to bake the cake and so I got to choose what kind. So there!


You will need:
1 cup of flour
1 1/2 tsp baking powder
1/4 tsp salt
5 eggs (don't crack em til I tell you to!)
1 cup of sugar
1 tsp vanilla
1/3 cup of milk
1 can of evaporated milk
1 can of sweetened condensed milk
1/4 cup of heavy whipping cream

Icing:
1 pint of heavy whipping cream
3 Tbsp of sugar
optional: maraschino cherries

You will do:
1. Preheat your oven to 350 degrees.
2. Spray a 9x13 baking dish with non stick spray.
3. Crack those eggs, divide the yolks and whites into separate bowls.
4. In a small bowl, beat the yolks with 3/4c of the sugar until it's well mixed.
stiff peaks
5. Add vanilla and milk to the yolk mixture.
6. In a large bowl, combine your flour, baking powder and salt.
7. Slowly pour the yolk mixture into the flour mixture, mix well.
8. In a separate small bowl, beat the egg whites until peaks form. As you continue to blend, pour the remaining 1/4c of sugar into the whites. You'll want the peaks to stand stiffly, but don't over beat because the whites will "break."

9. Gently fold the whites mixture into the rest of the batter. Don't mix for too long, just long enough for it all to get combined well. You will want the batter to be fluffy and airy.
when done, the cake will smell a little "eggy"


10. Pour the batter into the baking dish, pop into the oven for 35-45 minutes (mine took exactly 35 minutes). Stick a toothpick into it to make sure it's done, if it comes out clean you're good to go.

11. While the cake bakes, combine your evaporated milk, condensed milk and 1/4c of heavy whipping cream. Mix well.  I also added a teensy tiny splash of Bailey's - after all, it was for a 21st birthday cake!
12. Turn the cake upside down into a rimmed platter. Let it cool (20-30 minutes).
13. While the cake is cooling, start the whipped cream topping - on high speed, mix the one pint of heavy whipping cream with 3 tablespoons of sugar, until it's gorgeously whipped. Refrigerate until you're ready to serve the cake.

14. Take a fork and begin to poke holes into the cake.


15. Ever so slowly begin to pour the milk mixture onto the cake. You don't want to dump it all out at once, the idea is to have the cake soak up the milk uniformally. So drizzle in a design, watch it get soaked up, be sure to get all parts of the cake. Don't worry if it seems like the milk is going straight through the cake and pooling around the edges. Pour the entire mixture and come back in 20 minutes, it'll have soaked up all that sweet goodness.
16. When you're ready to serve, spread the prepared whipped cream over the top of the cake. Cut it into squares, serve with a maraschino cherry on top if you like.

 
And that, my friends, is the end of my Pinterest Summer Recipe Challenge. Sound off - which recipes did you try?


The -would be-final Pinterest Summer Recipe Challenge: Gnocchi Mac n Cheese (a pictorial fail)

If you are a Pinterest addict like I am, you'll know that sometimes you pin ideas that you, for all intents and purposes, plan to try at some point. My recipe board, Nyam, is full of those. I decided that this summer, I'm actually going to make use of this board and try these recipes out. My goal is 1-2 recipes per week, and I'm calling it my Pinterest Summer Recipe Challenge. You can find more of my challengers here.

With much anticipation, summer is finally drawing to a close! Don't get me wrong, I love summer, but I love all more. And I think that overall I'm in love with the first half of every season. After that, it's just old.

So I had planned on my final Pinterest Summer Recipe Challenge to be somewhat fall inspired. It was actually my first pin EVER and I finally got the gumption to do it. And oh my gawsh, it met and exceeded everything I had hoped and dreamed it would be.

I'm speaking of this fabulous Gnocchi Mac n cheese.

If you're unfortunate enough to never have heard of (or tasted) gnocchi (pronounced "nyo-ki"), my deepest sympathies for you. Gnocchi consist of potato dough and are tiny little dumplings, usually the size and shape of the top digit of your thumb.  Being the Polish girl that I am, I have grown up with potatoes alongside almost every meal. We Poles even have a version of gnocchi, called 'kopytka', which translates to 'hooves' because I suppose they sort of look like a part of a cow's hoof. For the Germans, spatzle would be something like gnocci.

I can't remember when I discovered that gnocchi and kopytka are the same thing (just different shapes), but I pretty much insist on having gnocchi at least once a month. Usually just sauteed lightly with some traditional red pasta sauce thrown on top.  But this time, oh man.. this recipe called to me in ways that gnocchi has never called to me before.  Because this recipe features tasty, aromatic cheeses..which I'll admit I'm a total sucker for.

Now that I've gotten you drooling, I have a confession. I've let you down. I made these dish for dinner a couple weeks ago, took spectacular pictures, but somehow the little Canon elves/gnomes/trolls invaded my memory card and ate the images. I guess it was so delicious that mythical, completely made up by me creatures had to destroy the evidence so that perhaps I should make it again.

Alas, Canon creatures, I can't make it again so soon because we're still recovering.

Nonetheless I couldn't blog about this amazing recipe and not share. So here we go, just forgive me for the lack of pictures.

Edit: after posting this earlier today, I decided that it just wasn't right to post without a picture.. so .. I whipped it up for lunch.


You will need:
1 pound of premade or homemade gnocchi (I have my own gnocchi recipe, which I may blog about in the future.. for this time, I used prebought)
2 T butter
2 tsp minced garlic
1 T flour
3/4 cup milk
1 teaspoon of any fancy mustard - I used a spicey hot mustard that my mom found at a winery :)
1/4 cup shredded Gruyere cheese
1/4 cup shredded Fontina cheese
1/3 cup of shreddd parmesan
Salt and pepper to taste

You will do:
1) Spray a medium sized casserole dish with nonstick spray. Prepare gnocchi by boiling in salted water until they all float. Drain and place into your casserole dish. Preheat oven to 375 deg F.
2) Slowly melt the butter on a skillet. Add the minced garlic, let it simmer for about a minute.
3) Whisk in the flour to thicken it up, break up any lumps. Add mustard and milk. Keep on low heat, continually stirring until the sauce thickens.
4) Slowly incorporate shredded cheeses, continue to stir as the cheese melts.
5) Taste test - then add salt and pepper if you wish. So good!
6) Pour the sauce over your gnocchi, top with the parmesan.
7) Bake until cheese is bubbly, about 15-20 minutes. Rest for a few minutes before serving.

We served this with some steamed broccoli and sourdough bread.. OMG! YUMMERS!!!

One more recipe to go.. I apologize for my absense these last couple weeks.. had some big stuff brewing - we sold our home! Post with details to come :)

Monday, September 3, 2012

Guest Post at That Mama Gretchen: Zucchini Cakes


Today you'll find my guest post over at my good friend Gretchen's blog while she is on her maternity leave with her little man. Gretchen and I go waaaaaay back to our high school days working at a local coffee shop, dreaming about one day owning a coffee shop of our own that is space aged and provided lattes on conveyor belts. LOL! It's so funny to think about us as giggling high schoolers 10 years ago...and here we are fellow mamas in the blogging community. Back then if you had asked me about a "blog," you would have gotten a really blank stare in return. Ps, I feel old that now I can say things like "10 years ago" in reference to my life.

Anyways, like I was saying.. as summer draws to a close, check out my second to last Pinterest Summer Recipe Challenger on her blog today - Zucchini Cakes. These are like crab or salmon cakes, just with zucchini. YUM! We paired them with stuffed salmon, grilled shrimp and a strawberry salad. A perfect summer dinner.

To see my other posts on the recipes I've tried out this summer, check them out here.


Tuesday, August 28, 2012

Thirsty and Hungry.. What gives?

When a mama's body knows, a mama's body knows, right? For the last week, I've been extra thirsty, hungry for protein and fiber, and on a whim started taking fenugreek again. I didn't feel like I was getting low in supply, but just felt like I should take some.

Then, towards the end of last week, Penny started acting not quite like her usual joyous self. A little more whiny, needy, pushy, grabby, chompy. Bored easily. Nap and sleep schedules were a little off, too. I figured that we had been traveling a lot, been out and about during the day and it was just taking its toll. Heck, it was taking it's toll on all three of us. Adam did the math and he's commuted (via car or bus) over 30,000 miles in the last 10 months. He is tired. So I decided that that this past weekend would be a break for our little family and hopefully everyone would feel rejuvenated afterwards.

It helped, but not as much as I had hoped it would. Penny is still "off." I've come to the realization that teething isn't as much to blame for it as I've been thinking.. The little sugar is on a growth spurt. I don't know why I ignored the signs, but cluster feeding sessions from this morning is what finally turned the light bulb on for me.

What truly amazes me is that my body knew before my mind would accept it. It's so convenient that my body and hers are still so in tune with each other, even after the separation of birth. I've read a few posts in the last week or so that exemplified this connection, Lautaret Bohemiet's being my favorite. In Western culture we try to disconnect the mind and body so much, to the point where we just don't trust or listen to our body's cues. Some might think it's a bunch of psychic mumbo jumbo, but I'm a believer.  There's stuff going on beneath the surface that we aren't acutely aware of, but our body is working away 24/7.

the remains
One of the things I've been craving this past week were avocados (but, lets face it, I'll eat avocados any day, I don't need craving to be an excuse). So in a hurry, I pulled this recipe out of my Nyam Pinterest board and whipped it up for lunch today. It was whipped so quickly and efficiently, there was no time for pictures to justify one of my Pinterest Summer Recipe Challenge posts.

On that note, tonight's dinner is BBQ Pork Pizzas, with dough made from scratch and the pork roasted at a friends' party over the weekend. Again, not a Pinterest Summer Recipe Challenge post, but I hope that it will be worthy of some bragging about later ;)

Monday, August 20, 2012

Pinterest Summer Recipe Challenge: Red Velvet Brownies

If you are a Pinterest addict like I am, you'll know that sometimes you pin ideas that you, for all intents and purposes, plan to try at some point. My recipe board, Nyam, is full of those. I decided that this summer, I'm actually going to make use of this board and try these recipes out. My goal is 1-2 recipes per week, and I'm calling it my Pinterest Summer Recipe Challenge. You can find more of my challengers here.

I've never had "from scratch" brownies before. It's one of those foods (sort of like mac n cheese) that I always assumed began it's life in a box. To no one's surprise but my own, a lot of our quick and easy, "junk", out-of-the-box, traditional American foods really did come from home cookin'. Yes, I was impressed.

So then I find a combination for my love of brownies and red velvet. I love red velvet cupcakes, cake, you name it. I know that for the most part many red velvet recipes are just chocolate cake with red food coloring added.. but maybe it's all about presentation for me. I bet if someone were to give me a "blue velvet" cake I'd be just as in love. The greatest common denominator = chocolate. Hence, I just love chocolate. (ps- that wasn't a secret by any means!)

I present to you the love child from two of my favorite desserts:


You will need:
1 cup of unsalted butter, at room temperature
4 large eggs, at room temperature
1 1/2 cups of sugar
1 1/2 cups of brown sugar
red food coloring*
4 teaspoons of vanilla extract
2 1/2 cups of flour
6 teaspooons of unsweetened cocoa powder (I used Hershey's)
1/2 teaspoon of salt
*The original recipe calls for 2 oz of red food coloring. As I was making the batter, I did a double take and realized.. HOLY CRAP that is a lot of food coloring and I don't have that much! So, I used up my one bottle of 1 oz of red food coloring. See below for results.

You will do:
1. Preheat the oven to 350 degrees. Grease a 9 x 13 inch pan.
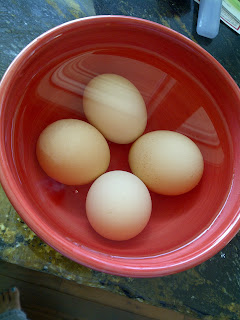
2. My little trick for bringing butter or eggs up to room temperature without having to wait a very long time is to put them in a bowl that is filled with slightly hotter than luke warm water. You don't want to put them into hot water because then your butter will melt and your eggs will cook.
3. Cream the butter and sugars.
4. Add one egg at a time, mix well between eggs.
5. Add vanilla and red food coloring. Be sure to scrape down the sides of your bowl as you go to make sure that you're mixing the color in completely into the batter (unless you want swirly brownies!).
6. In a separate bowl, combine flour, cocoa powder and salt. Mix together.

7. Slowly incorporate flour mixture into red mixture. Scrape down the sides often.
8. Pour the batter into the greased pan and bake for about 30 minutes.
Verdict: If you're looking for the all American brownie flavor that we've all grown to know and love, get the boxed version. But if you're looking for something a little classier, not necessarily middle school dessert style, go for these. They were oh-so-moist!


This recipe is brought to you by:

ps: weird Penny fact:
she *loves* sleeping with something partially covering her face. ??

Sunday, July 29, 2012

Pinterest Summer Recipe Challenge: Sour Cream Banana Bread

If you are a Pinterest addict like I am, you'll know that sometimes you pin ideas that you, for all intents and purposes, plan to try at some point. My recipe board, Nyam, is full of those. I decided that this summer, I'm actually going to make use of this board and try these recipes out. My goal is 1-2 recipes per week, and I'm calling it my Pinterest Summer Recipe Challenge. You can find more of my challengers here.
I know, it's been overdone.. Everyone's got their own version of banana bread that is to die for. But, over the last couple years I've learned to give sour cream the respect it deserves in the baking world. So, I gave this banana bread a shot. And I've officially dumped my old recipe and am keeping this one for the recipe book. Ah-may-zing!

You will need:
non-stick cooking spray
< 1/4 c of sugar
1/2 tsp ground cinnamon
1/2 c softened butter (or 1/2 c Tropical Traditions Extra Virgin Organic Coconut Oil)
1 1/2 c sugar
2 eggs
3 very ripe bananas
2 c sour cream
1 tsp vanilla extract
1 tsp ground cinnamon
1/4 tsp salt
1 1/2 tsp baking soda
2 c 1/4 flour

You will do:
1. Preheat your oven to 300 degrees.
2. Spray 2 bread pans with your non stick spray.
3. In a small bowl mix the <1/4c sugar and 1/2 tsp cinnamon. Dust both pans with the sugary mix.
4. In a larger bowl, cream butter and remaining sugar together. Add eggs, bananas, sour cream, vanilla and cinnamon. Blend until well mixed.
Normally I use bananas that are 1/2 a step away from moldy..they are BLACK.
But this time around I used these guys.

5. In a separate bowl, combine flour, baking soda and salt. Slowly incorporate into the banana mixture.
6. Divide batter between your pans.
7. Bake for 50-60 min, or until an inserted toothpick comes out clean.
Normally I include a picture of my little helper(s), but today this was done during naptime.. so here's what these two crazy cousins were up to a few minutes before.

Thursday, July 26, 2012

Pinterest Summer Recipe Challenge: Creamy Avocado Pasta

If you are a Pinterest addict like I am, you'll know that sometimes you pin ideas that you, for all intents and purposes, plan to try at some point. My recipe board, Nyam, is full of those. I decided that this summer, I'm actually going to make use of this board and try these recipes out. My goal is 1-2 recipes per week, and I'm calling it my Pinterest Summer Recipe Challenge. You can find more of my challengers here.
Can I just say that I love avocados? I'll scream it from the roof tops, I don't care..

I LOVE AVOCADOS!

So when I saw this recipe on pinterest, it was an immediate pin. I'm surprised I've waited this long to try it out.

You will need:
(serves 2)
2 avocados (the original recipe calls for 2 avocados for serving 4, but I believe I love avocados more than she does so I gave it a shot)
fettuccine noodles
1 good squirt of lemon juice
1/2 c grated *real* Parmesan cheese (not the powdered Kraft kind!)
salt and pepper to taste
1 tsp minced garlic
2 T olive oil
2 vine tomatoes
*I omitted the pine nuts from this recipe, couldn't find any in bulk.

You will do:
1. Preheat oven to 350. Cut tomatoes into 1/8ths. Sprinkle with olive oil, lay on a pan and bake for about 20-30 minutes (until they look almost like sun dried tomatoes)

2. Boil the noodles until they reach al dente (be sure to salt the water a little bit, I forgot and my noodles stuck together!).
3. While the noodles are boiling, cut skin and pit the avocados.
4. In a food processor (or KitchenAid mixer, as I didn't have a food processor or blender available) combine the avocado meat, lemon juice, cheese, salt/pepper and garlic. Blend until smooth.  The original recipe has you sprinkle the Parmesan cheese last, but I liked it infused into the "sauce."

5. Don't forget your tomatoes! Take them out of the oven when they're ready!
6. Once the noodles are done, drain the water and portion the noodles out into two bowls.
7. Add sauce on top of the noodles. Sprinkle tomatoes on top and serve!
Some thoughts:

This really ended up being guacamole on pasta noodles. I'm not complaining, it was still delicious, but Adam and I agreed that this is an excellent base for a dish. It needs something more.  In the future, I might try adding shrimp or chicken, Adam suggested hot sauce (a weird combination, but we love toast with avocado and hot sauce in the morning!).

ShareThis

Related Posts Plugin for WordPress, Blogger...